It can be a tricky balance designing a garden for both children who want to play and adults who want to relax as well. Creating a garden that meets both the needs of active lively children and wearied parents is entirely possible with careful thought. So that neither gets overlooked and the garden works for all family members! This guide includes an example of an overlooked, underloved and uninspired garden in the suburbs shows how using zones allows you to meet the needs of both children and parents!
Designing a garden that works for eciteable children who want to launch footballs through your borders AND exhausted parents whowant five minutes of peace with a coffee is genuinely challenging. Most families end up with one of two disasters: either a garden completely surrendered to plastic play equipment and bald patches of mud, or a pristine adult space where children are constantly told “don’t touch that” and “get off there.”
Neither of these extremes makes anyone happy. The good news? You absolutely can create a garden that provides an ideal play space for energetic children while offering adults a genuinely relaxing escape. It’s not magic, and it’s not about having a massive budget or acres of space. It’s about thoughtful zoning and strategic design decisions that I’m going to walk you through in this guide.
I’m going to show you exactly how I transformed a depressingly overlooked suburban garden in Manchester from a compacted builder’s mess into a space where two young children could adventure safely, whilst their parents could actually sit down and breathe. Before we started, this garden had the full set of suburban garden clichés: the random overgrown tree nobody quite knew what to do with, the uninspiring square of struggling lawn, and those odd, uncontrollable shrubs lurking in corners. After the transformation? Distinct zones that work for everyone without the garden screaming “playground” from every angle.
The Budget Reality: Creating Family Gardens Without Remortgaging
Let’s be brutally honest about something that most garden designers tiptoe around. Creating a family-friendly garden can cost an absolute fortune if you’re not strategic, and I’m not going to pretend otherwise. Walk into any garden centre in spring, and you’ll find play equipment ranging from £200 for a basic swing set to £3,000-plus for elaborate climbing frames. Add professional landscaping, quality paving, raised beds and planting, and you’re easily looking at £10,000 to £40,000 for a complete garden transformation.
For most young families juggling mortgages, childcare costs and everything else life throws at you, that’s simply not realistic. The good news is that with some creativity, willingness to graft, and strategic phasing, you can create a brilliant family garden for a fraction of that cost. I’m going to walk you through exactly how, because I’ve designed gardens for clients at every budget level. Some of the most successful family gardens I’ve created have been the ones where money was tightest and creativity was highest.
Phase Your Garden Development
The single biggest money-saving strategy is phasing your garden development over two to three years rather than trying to do everything at once. In that Manchester garden I showed earlier, we didn’t install everything simultaneously. Year one focused on getting the hard landscaping bones right: the patio, paths, and raised bed structures. These are the permanent features that require professional skills and are worth investing in properly because they’ll last for decades.
Year two tackled the planting and lawn installation. By this point, the clients had recovered financially from year one and could spread the cost. Year three added the finishing touches: additional seating, lighting, and some play features. This phasing approach allowed them to afford quality materials and workmanship throughout, rather than compromising everything to do it all at once.
When phasing your garden, start with the elements that provide structure and usability. Get your hard landscaping sorted first so you’ve got proper surfaces to use. Then add planting, which can be done incredibly affordably if you’re patient and savvy. Finally, add the bells and whistles when budget allows.
The DIY Approach to Play Features
Right, this is where you can save absolutely massive amounts of money if you’re remotely handy with tools. That £2,500 climbing frame? You can build something just as functional for £200 to £400 in materials if you’re willing to put in the elbow grease. I’ve worked with families who’ve created incredible play features using reclaimed scaffold poles, recycled timber, and basic construction skills.
A simple swing set can be constructed from two sturdy posts, a crossbeam, and proper swing seat fixings. If you’re using timber, ensure it’s at least 100mm x 100mm for the posts, set in concrete to a depth of 600mm for stability. Use treated softwood or naturally durable hardwood, and ensure all edges are rounded and sanded smooth.
Budget: roughly £80 to £150, depending on timber choice.
For a climbing frame, old scaffold poles are genuinely brilliant. They’re incredibly strong, weather-resistant, and you can pick them up second-hand from scaffold hire companies or demolition yards for a fraction of new prices. Bolt them together to create climbing structures, monkey bars, or frames for rope ladders and cargo nets. Add a platform deck at one end, perhaps a slide at the other (you can buy just the slide component separately), and you’ve got a proper adventure playground for under £300 in materials.
The absolute bargain-basement approach to play structures is using repurposed pallets. Now, I need to add caveats here because not all pallets are suitable. You want heat-treated pallets (marked HT) rather than chemically treated ones (marked MB), and they need to be in good structural condition. But assuming you source suitable pallets, they’re often free from builders’ merchants or industrial estates.
Stack pallets to create forts, dens, obstacle courses, or even simple playhouses. Secure them properly with coach bolts, ensure there are no protruding nails or splinters, and sand any rough edges. A few pallets, some basic fixings, and perhaps some weatherproof fabric for a roof, and you’ve got play structures that cost essentially nothing but time and effort.
Growing Your Garden from Seed & Cuttings
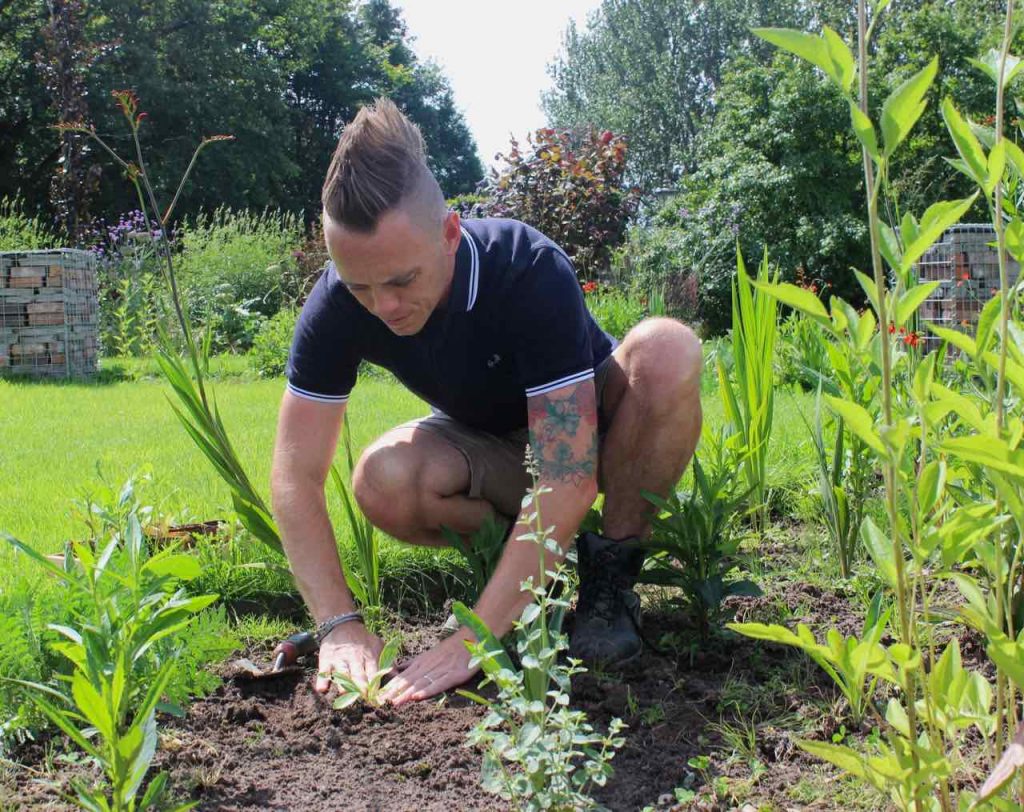
Planting is where families panic about costs, seeing £15 perennials and £40 shrubs and quickly calculating that filling their borders will cost thousands. It absolutely doesn’t have to. In one family garden I designed, I specified perhaps £800 worth of plants if bought as mature specimens. The clients actually spent about £250 by growing from seed, taking cuttings, buying small plug plants, and being strategic about what they purchased mature.
Hardy annuals grown from seed give you instant impact for pennies. A packet of Californian poppy seeds costs £2 and will fill a square metre with vibrant orange flowers. Cornflowers, nigella, calendula, cosmos, and sunflowers are all ridiculously easy to grow from seed sown directly where they’re to flower. For under £20, you can have entire borders filled with colour in their first summer whilst your slower-growing perennials establish.
Many perennials are similarly easy from seed if you’re patient. I grow Echinacea, Rudbeckia, Aquilegia, and hardy geraniums from seed routinely. They won’t flower in their first year, but by year two, you’ll have substantial plants, and the cost per plant is literally pennies rather than pounds. You can buy packets of wildflower seed mixes incredibly cheaply, and whilst they won’t give you the sophisticated planting schemes I normally create, they’ll give you colour, wildlife value, and ground coverage whilst you establish your permanent planting.
Cuttings are free plants from friends, neighbours, or your own garden. Penstemons, salvias, lavender, rosemary, and sedums are all trivially easy to propagate from cuttings. Ask anyone who gardens, and most will happily give you cuttings of their plants. Take them in late summer using soft growth from the same year, stick them in gritty compost, and you’ll have rooted plants by spring, ready to go into your borders.
Buy small and be patient. A 9cm pot perennial might cost £3 compared to £8 to £15 for a 2-litre pot. Yes, it’s smaller and will take longer to establish, but if you’re working to a tight budget, buying small means you can afford three times as many plants. In two years, you won’t be able to tell the difference.
Second-Hand & Reclaimed Materials
The reclamation yard is your absolute best friend when creating family gardens on a budget. I’ve sourced stunning natural stone paving for £8 per square metre compared to £40-plus for new. Railway sleepers for raised beds, old bricks for edging, reclaimed timber for decking and structures which are all available at fractions of new prices if you’re willing to hunt around.
Facebook Marketplace, Gumtree, and local selling sites are goldmines for garden materials. People are constantly giving away or selling for pittance amounts items such as paving slabs, gravel, topsoil, plants, pots, and garden furniture. I’ve seen entire pallet loads of quality paving offered free to anyone who’ll collect. Unwanted play equipment from families whose children have outgrown it often appears regularly at giveaway prices, sometimes free, just to get rid of it!
Skip diving (with permission) and building site salvage can yield incredible finds. I’ve rescued perfectly good timber sleepers, interesting stones, and usable materials from skips countless times. Obviously, ensure you have permission and that you’re not trespassing, but many site managers are happy for people to take usable materials that would otherwise go to landfill.
Living with an Imperfect Garden
Here’s something that took me years to really understand. Young families don’t need perfect gardens. They need functional gardens that serve their current needs without breaking the bank or requiring constant maintenance. That bit of bare earth where you’ll eventually install a nice border? For now, it’s fine covered with bark mulch or even just left as earth. Your children honestly won’t care that it’s not beautifully planted.
The lawn that’s half weeds and definitely not bowling-green quality? Completely acceptable. Children don’t care whether it’s pure perennial ryegrass or a mixture of grass, clover, and daisies. They care that it’s soft to play on and provides space for their games.
Embrace imperfection and phase things in as the budget and time allow. Your garden will evolve over the years, and that’s absolutely fine. Some of the best family gardens I know have developed organically over time as parents added bits and pieces when they could afford them, creating spaces with real character and history rather than instant, expensive perfection.
Key areas when designing a family friendly garden
Before jumping into designing a family-friendly garden and planning what goes where, it’s essential to consider the following questions to understand your garden’s needs fully and wants. This is about determining the functions and needs of how you and your family are going to use the garden. This is not about a family party once a year; this is the 95% of the time usage, so be honest with yourselves!
Grab a pen and paper and list the following questions along with your family’s answers:
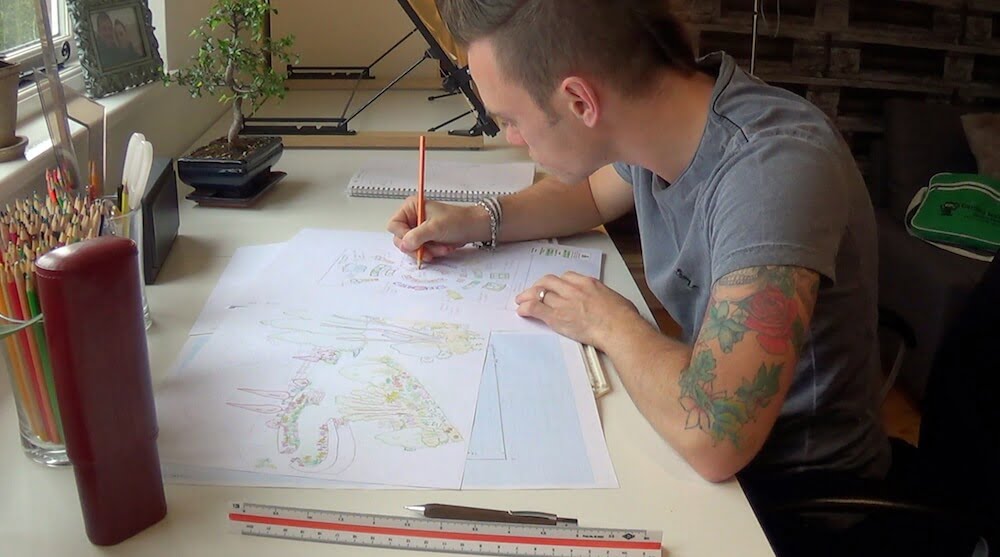
If you’re not using a Garden Designer, it’s worthwhile sitting down and sketching up some ideas of your garden to see where garden features may best sit. Don’t forget to add storage and mark on any existing trees, hard landscaping or existing buildings.
How to design a family friendly garden?
Before you start laying down paving or erecting play equipment, it is really worthwhile spending some time thinking about how you’re going to use the garden. Just because you are accommodating children with potential play area,s it doesn’t mean that adults can have somewhere delightful to relax as well. Here are my top tips to ensure the needs above are factored into your design properly and not just wedged into the garden’s corners.
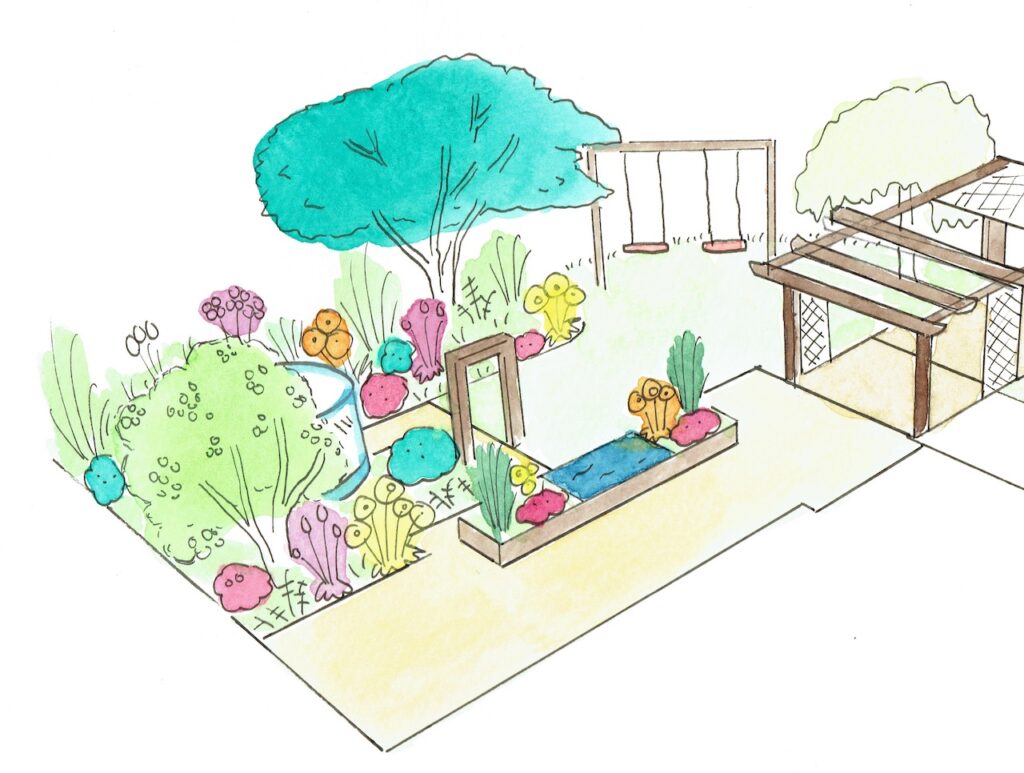
1. Use zoning in the garden
Zones are incredibly useful in garden design. Simply put, it’s breaking up the garden space into different, distinct areas. A good example is having a play area in one part, usually close to the house so that you can keep an eye on your children. Another example may be a grow your own area, away from the play area, to grow vegetables or an adult entertaining terrace in the sunniest part of the garden. Storage is often overlooked, and I usually add this as an addition to one of the zones, usually the grow your own area.
Creating distinct areas will help provide all members of the family with a distinct area whether its play or relaxation
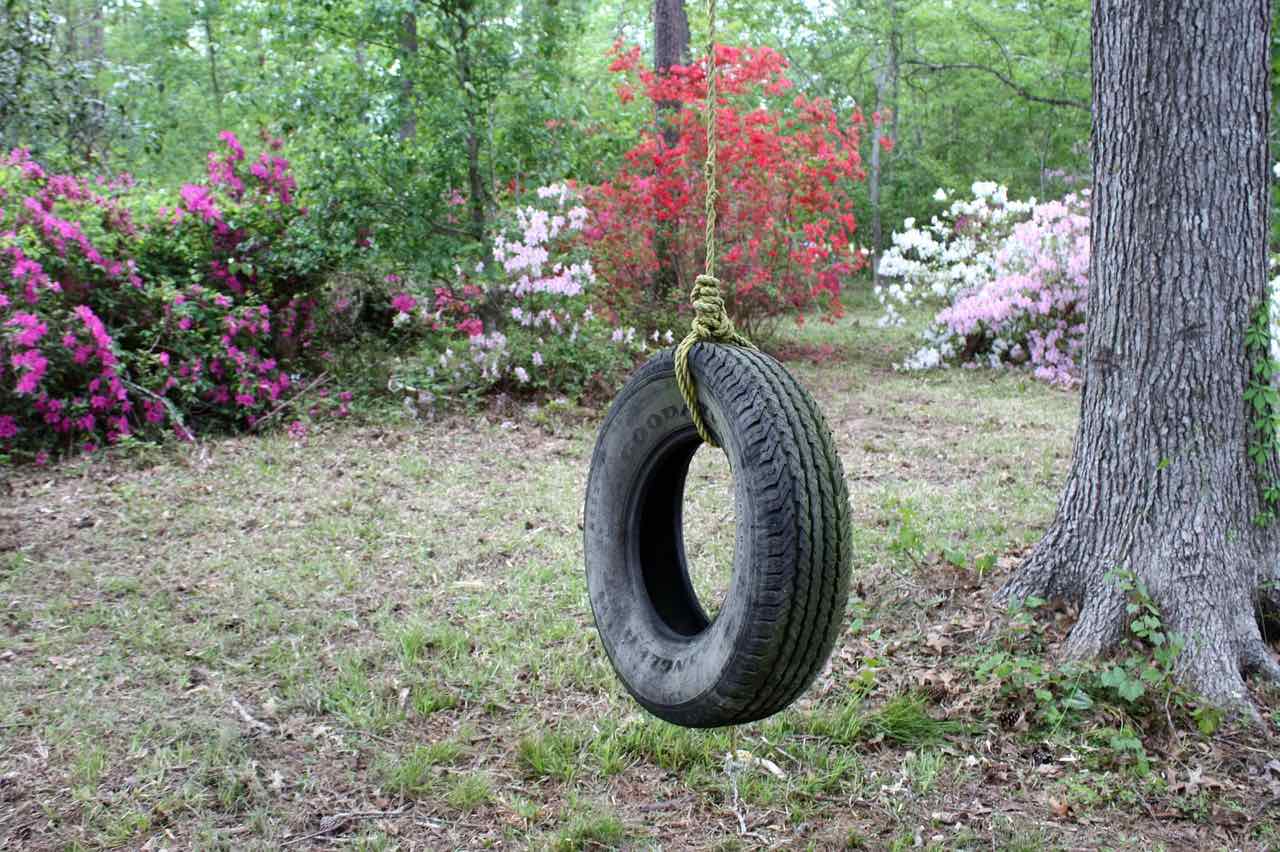
2. Play equipment doesn’t need to be an expensive eyesore
There’s a huge market out there for massive jungle gyms and play equipment. In fact, you can spend thousands for a quality, solid play area. However, you need to consider just how active your children are and whether the investment will be well utilised.
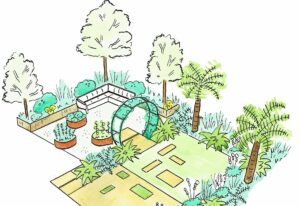
You may find that your children are just as happy on a smaller swing set, rope swing or shed/playhouse. Getting creative can often be both exciting and more cost-effective. In this garden, I used scaffolding poles to create a jungle gym, which also doubled as a walkway arbour. Meaning once the children had grown up, the structure still has a life.
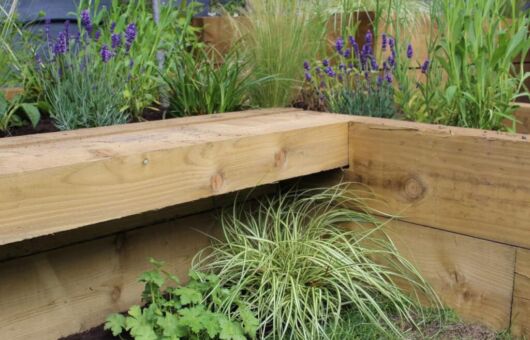
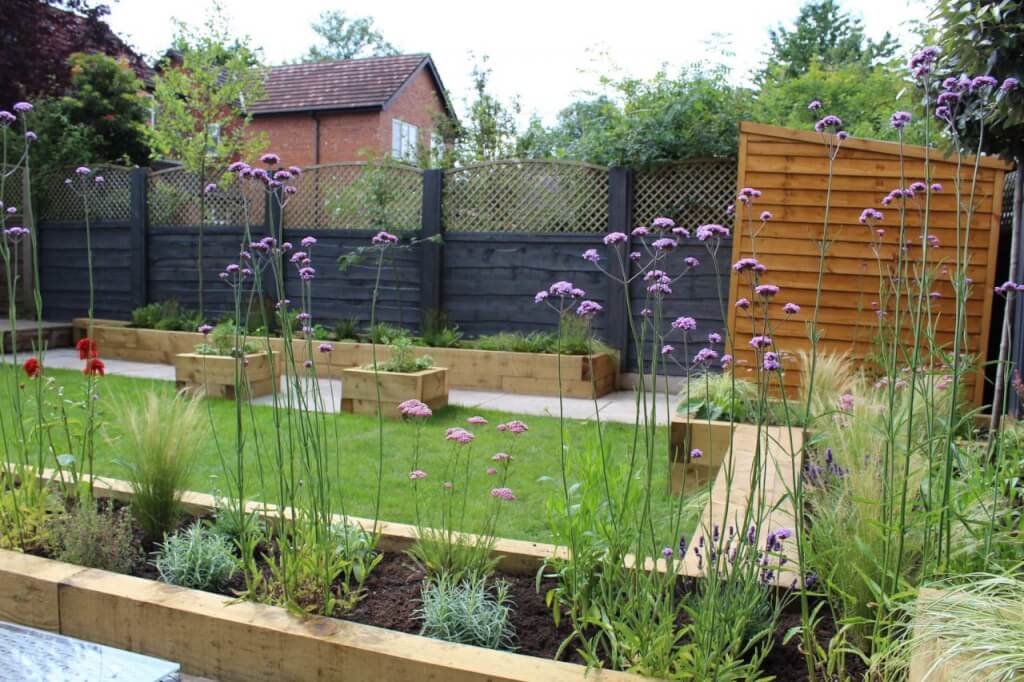
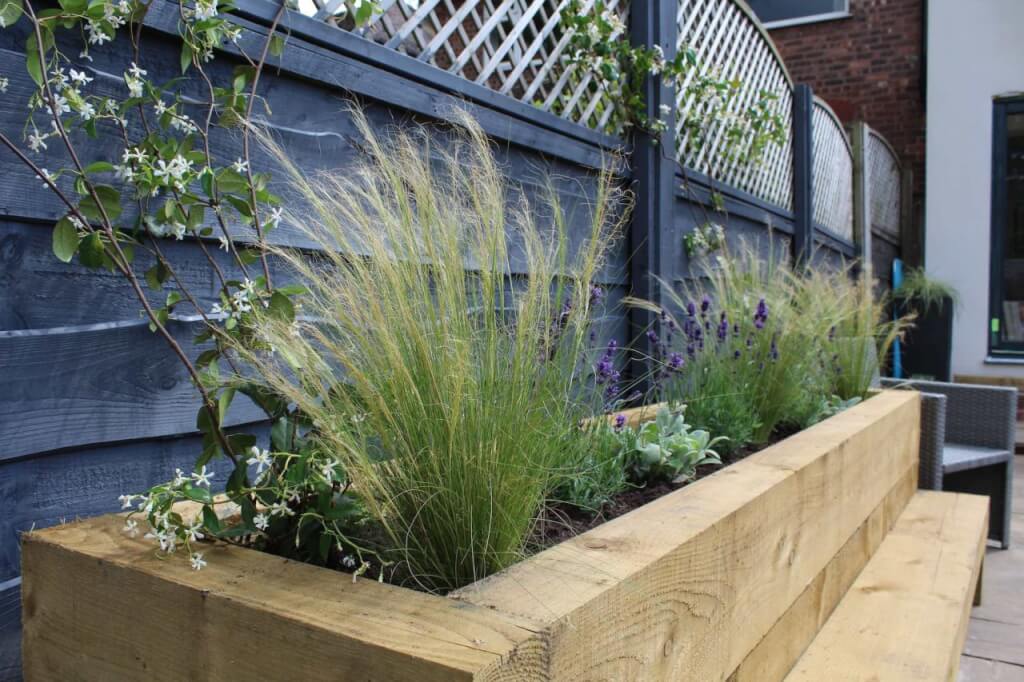
3. Use raised beds
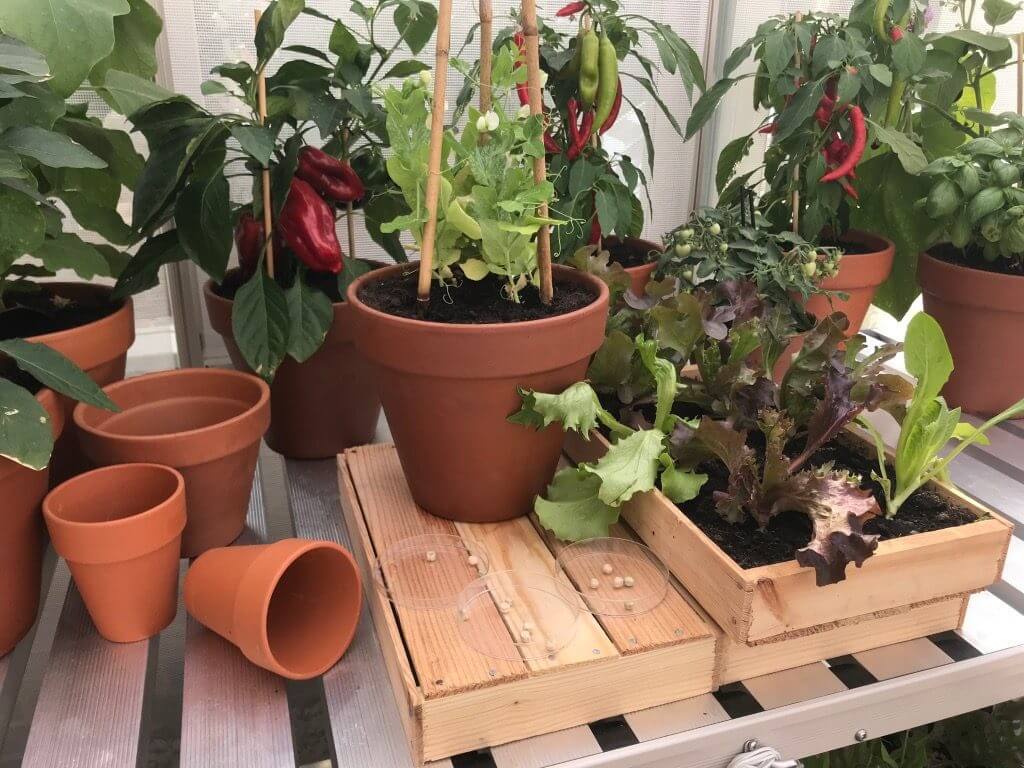
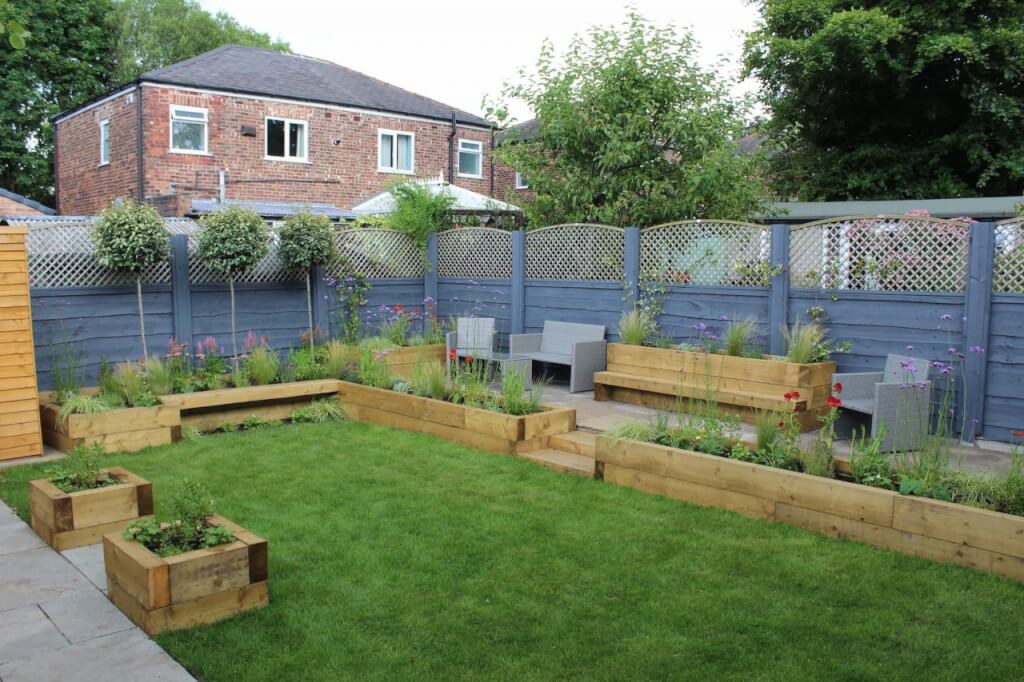
Raised beds can save you a fortune if you have particularly poor soil or bad levels in your garden. They are also great for children as they act as seats, jumping off areas, playgrounds and mini tables for their adventures. Bringing toy sets outside to play in the borders is super low-cost and will allow your children to become creative!
See how the raised beds add height, interest and limitless play surfaces?
4. Paving and pathways can help separate the garden zones
Paving can really help split up a garden, making the zones more obvious. By adding a path off a football pitch/lawn, you can help mark out which area is for the children and which is a parent zone. The use of level paths can also double up as a road for children’s play or a bike track—my guide on DIY paths may be helpful to bookmark here, which gives you a plethora of options.
Using stepping stones can provide a ‘stone river’ for games and help add drama to a garden. Brickwork paths can be both stunning and engaging for children and give texture to your space. The options are endless!
Children love stepping stones through borders or areas of the garden as you can see form the garden above and how engaging this path is!
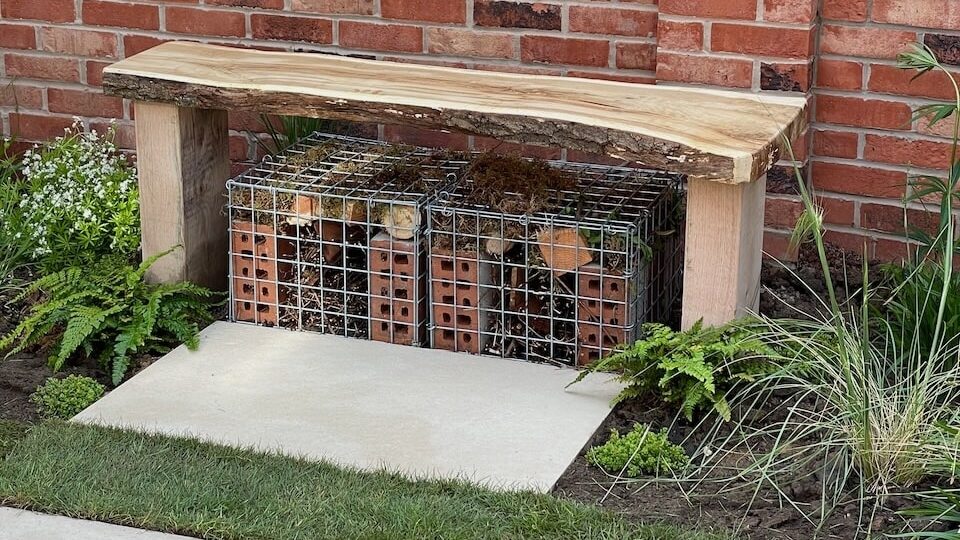
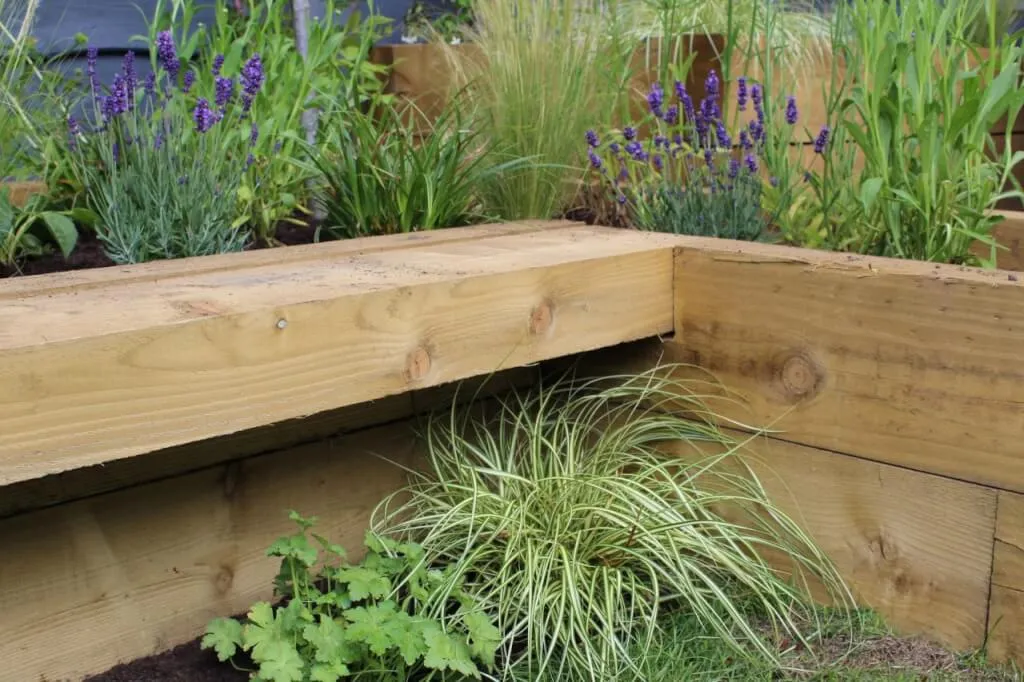
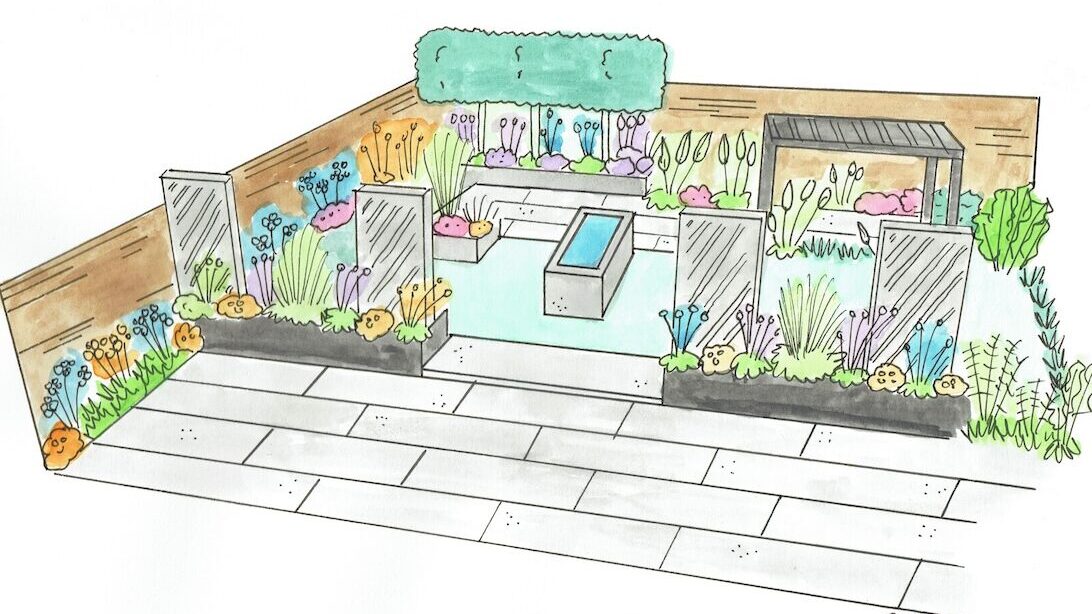
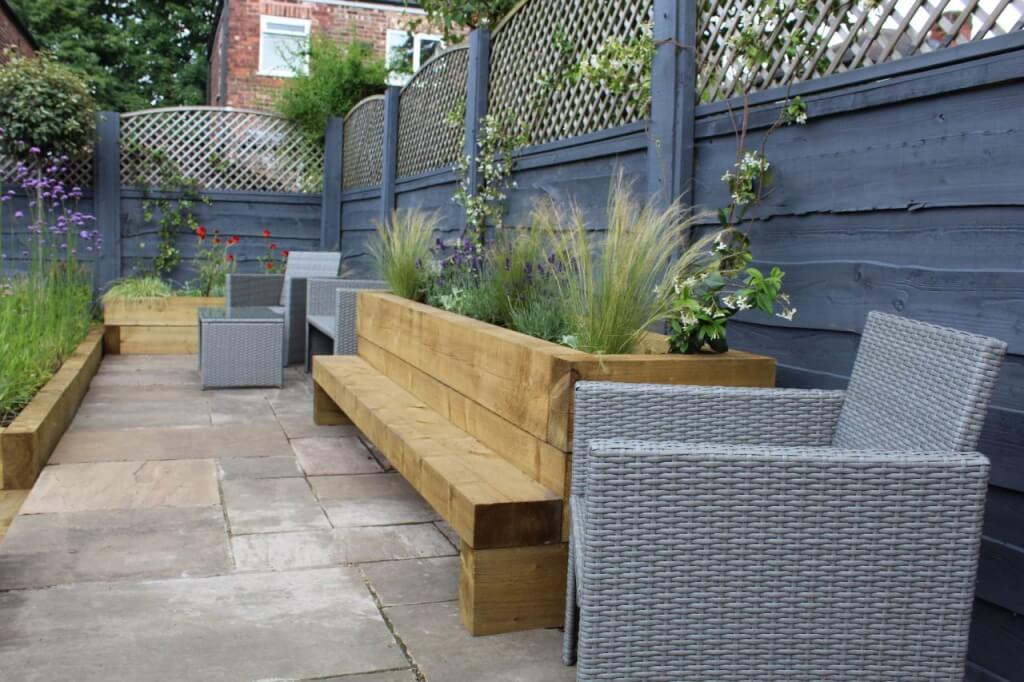
5. Integrated garden seating
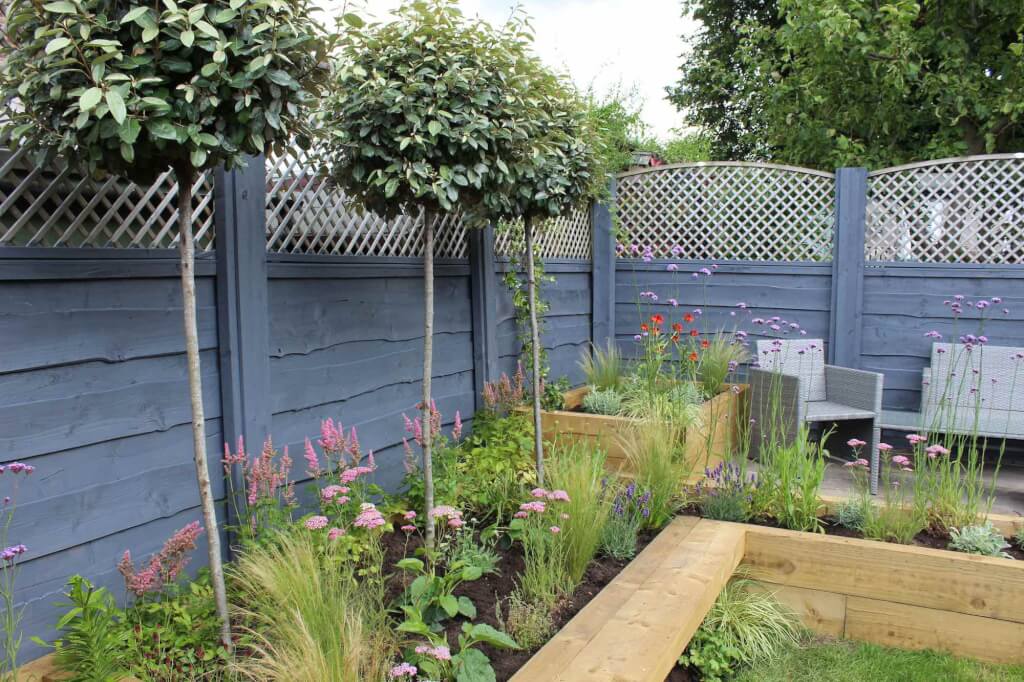
Seating is an important function of any garden. However, garden furniture can take up a lot of room and require storage in the winter months. The use of timber-raised beds in this garden design allowed me to incorporate integrated seating in the form of benches. This gave the client far more seating for those impromptu BBQs, parties and children’s playtime. It blends in perfectly with the garden and means they can chase the sun as it moves around this garden.
Planting under one of the benches helps pull the visitor almost into the garden. When sitting there, you get the feeling of being sat in the herbaceous border. It also means as your feet rub up against the Thyme, you get the wonderful scent of it.
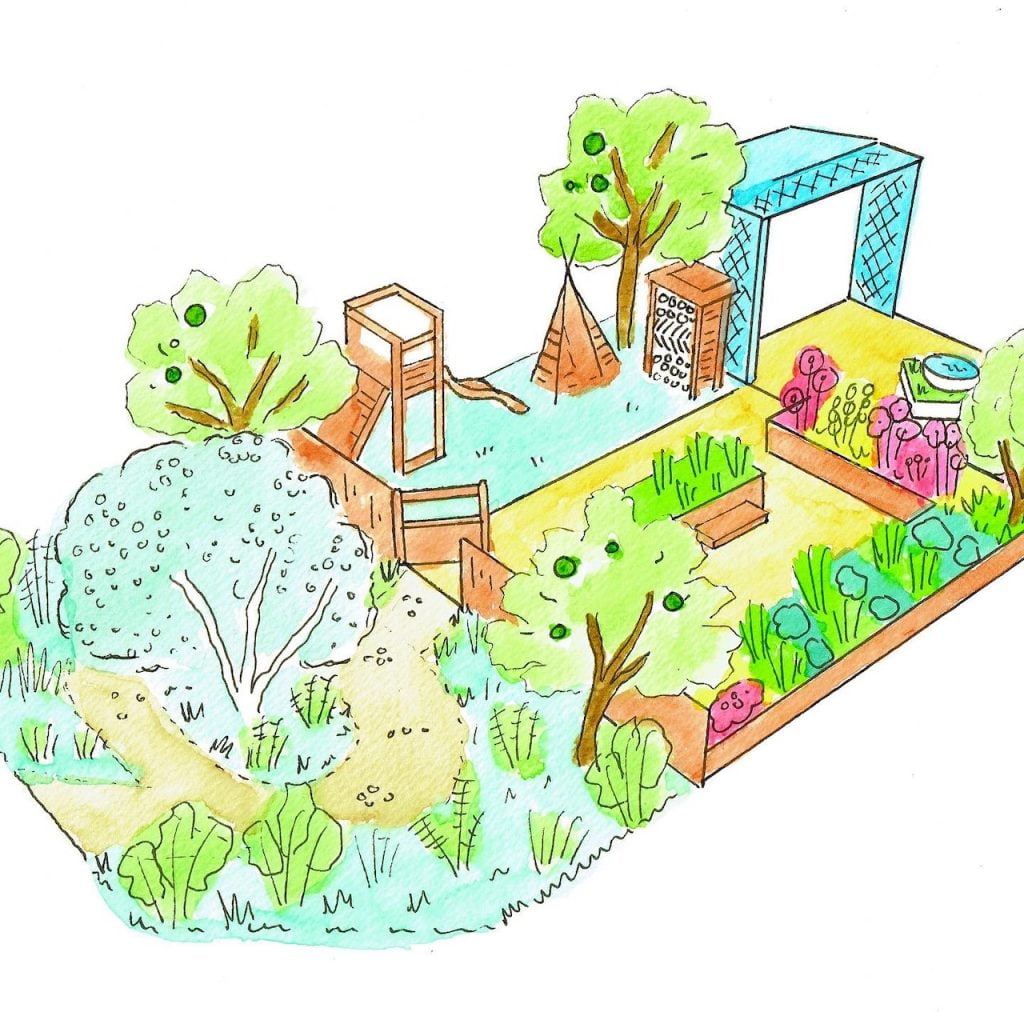
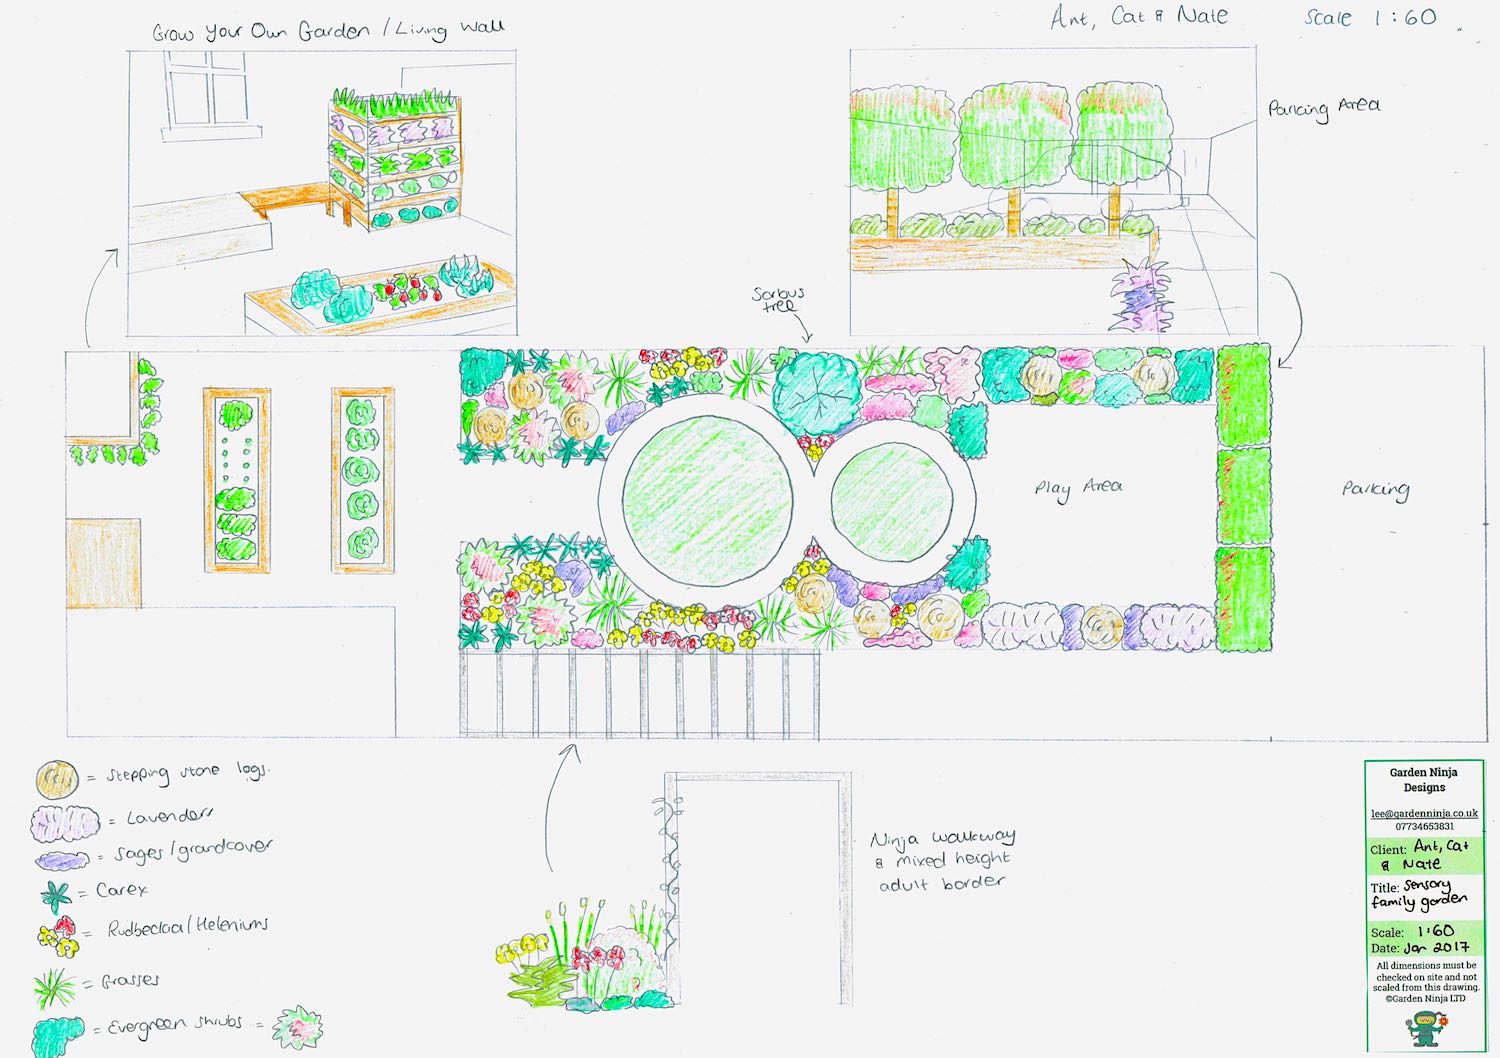
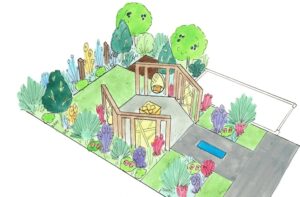
Family Friendly Garden Design Example
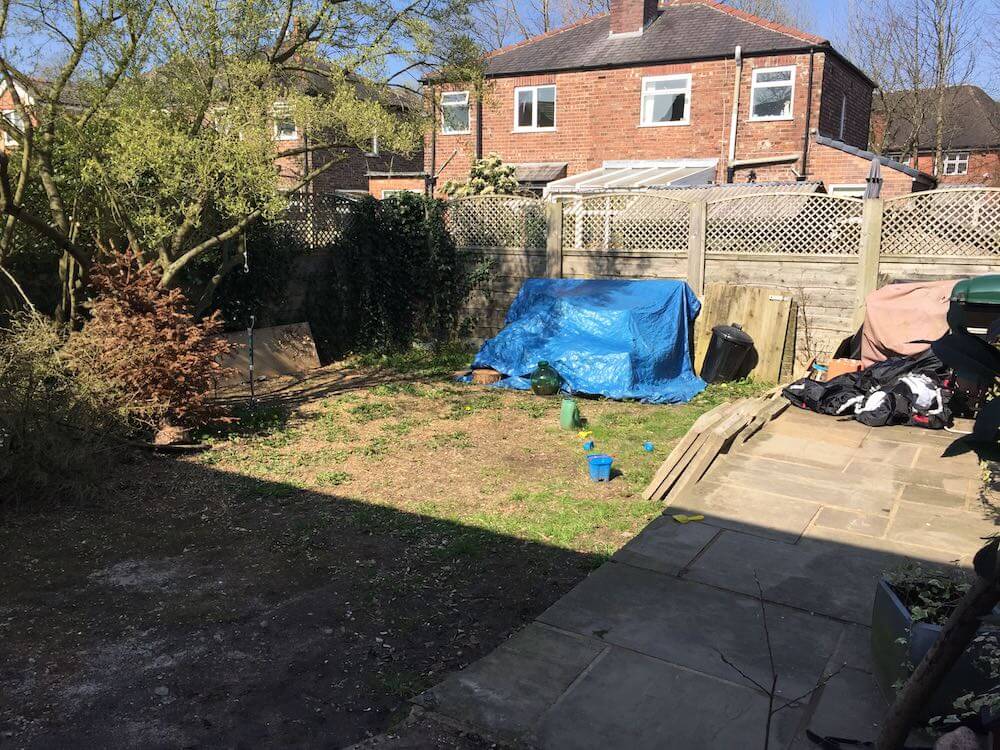
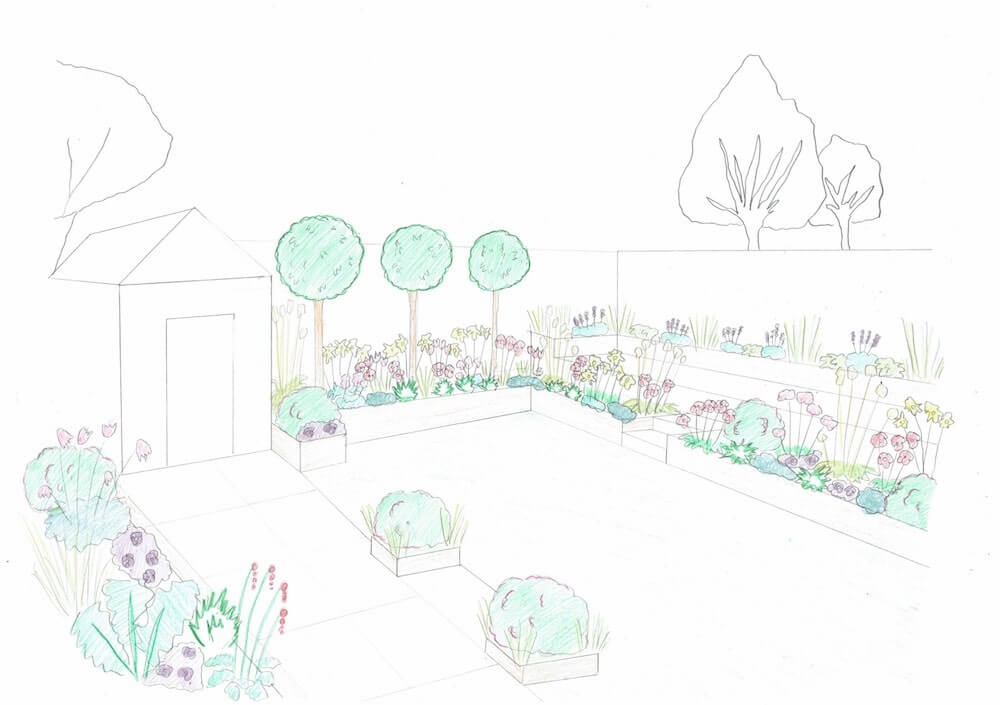
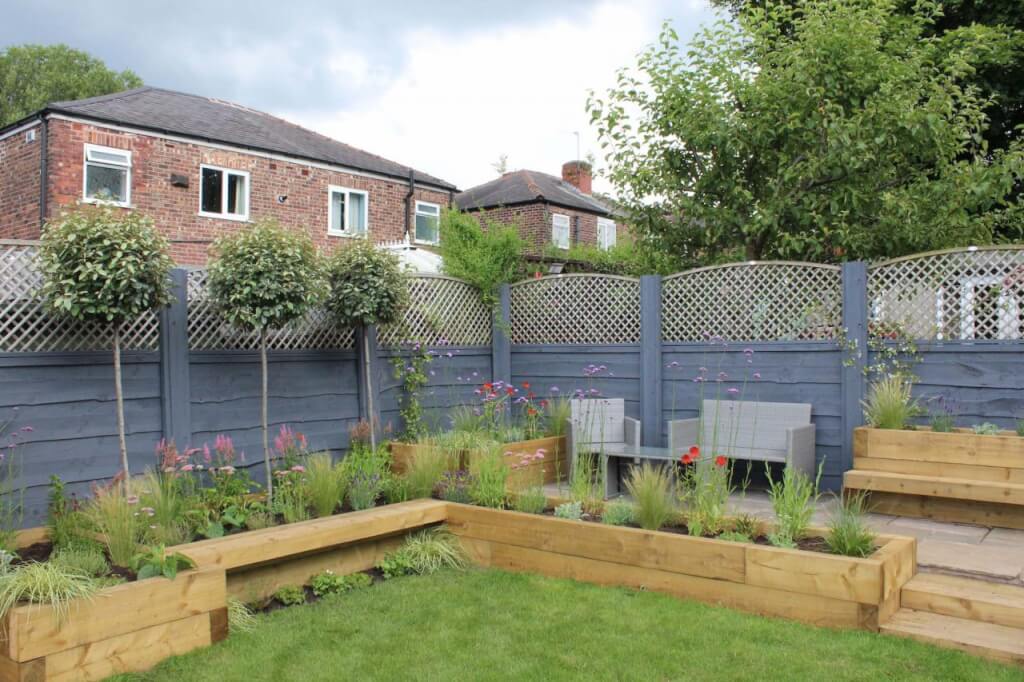
This offending garden is a North-Facing, overlooked house in Manchester, which I was asked to redesign. After some extensive house remodelling, the builders had used and abused the back garden leaving it as a compacted mess. It has the trademark random overgrown tree, the unimaginative square lawn and the odd out-of-control shrub. It retains too much water and has all sorts of different levels and bumps.
The clients asked Garden Ninja to transform this area into a space where two hard-working parents can relax and an exciting area where their young children can play safely. They were also keen to have a wow factor and some brightly coloured plants to encourage wildlife. I got the coffee on and started designing a haven of peace for the adults and a fun place for their children.
The Garden Before the Transformation can be seen above. Bare lawn, different levels. Overlooked by neighbours and anything but family-friendly!
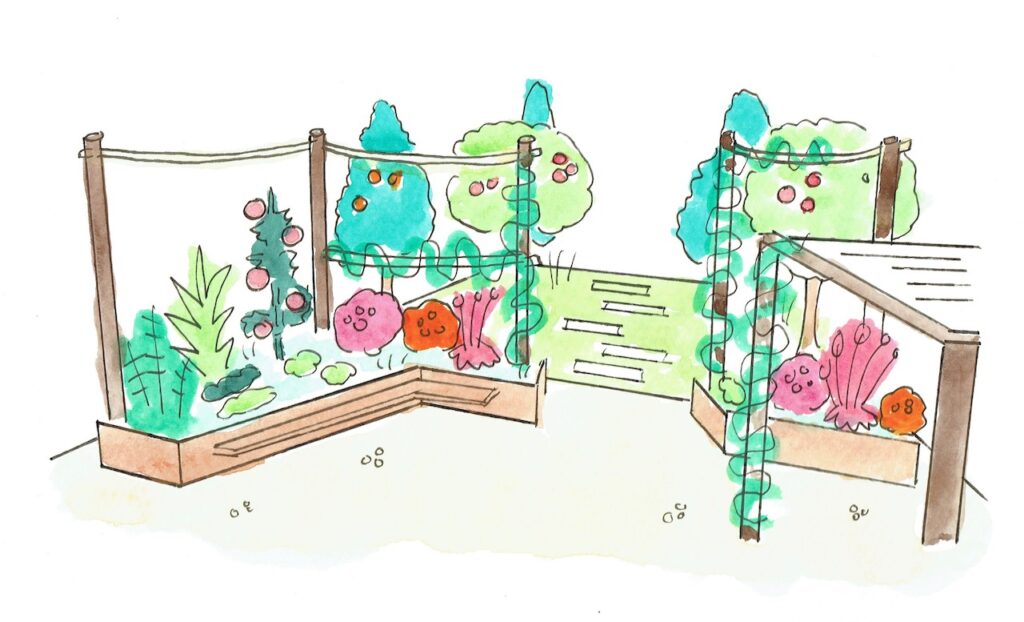
In a small garden, it’s easy to try and cram as much in as possible. We established that they definitely wanted a substantial lawned area for the children to play on. This would become the children’s zone, which could evolve over time and wasn’t too precious being used by an army of screaming children, a Wendy house, a battlefield or a makeshift football pitch.
The adult zone was designed as a raised terrace area, which would be screened off in part by planters and raised borders on each side. There was careful access planned should a parent need to quickly get to the children’s zone and to help provide flow around the garden. These beds and borders also helped break up the neighbouring views, giving privacy.
They also needed storage and access for bikes. Using cut-through paths to the children’s lawn allows movement between the zones and helps join the garden together. Yet encasing the zones in borders with various heights gives the feeling of privacy when in each zone.
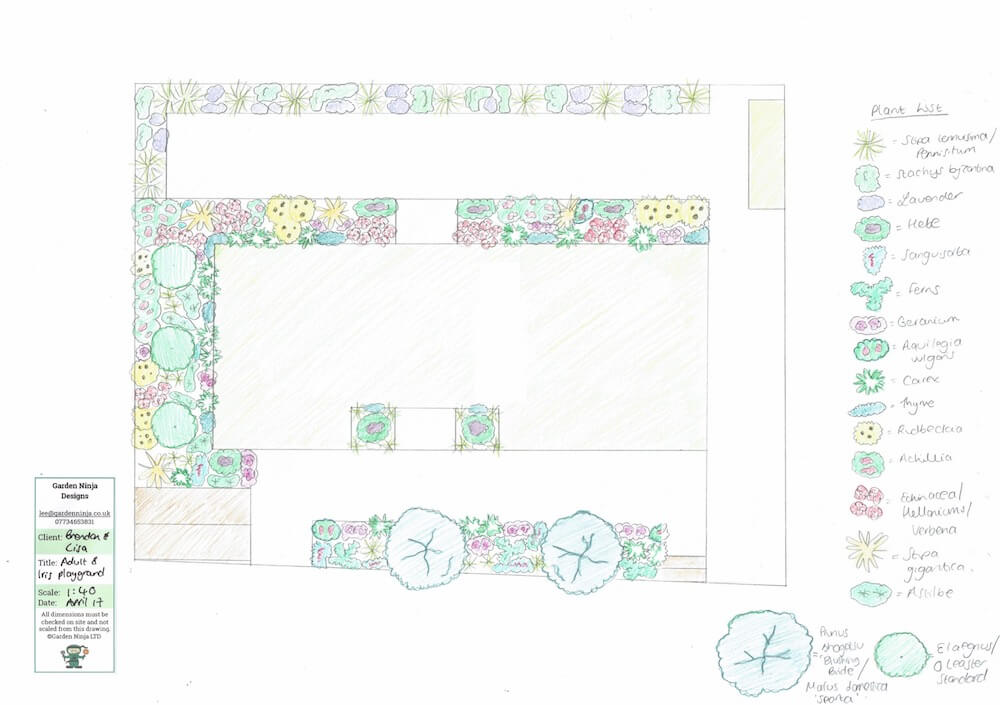
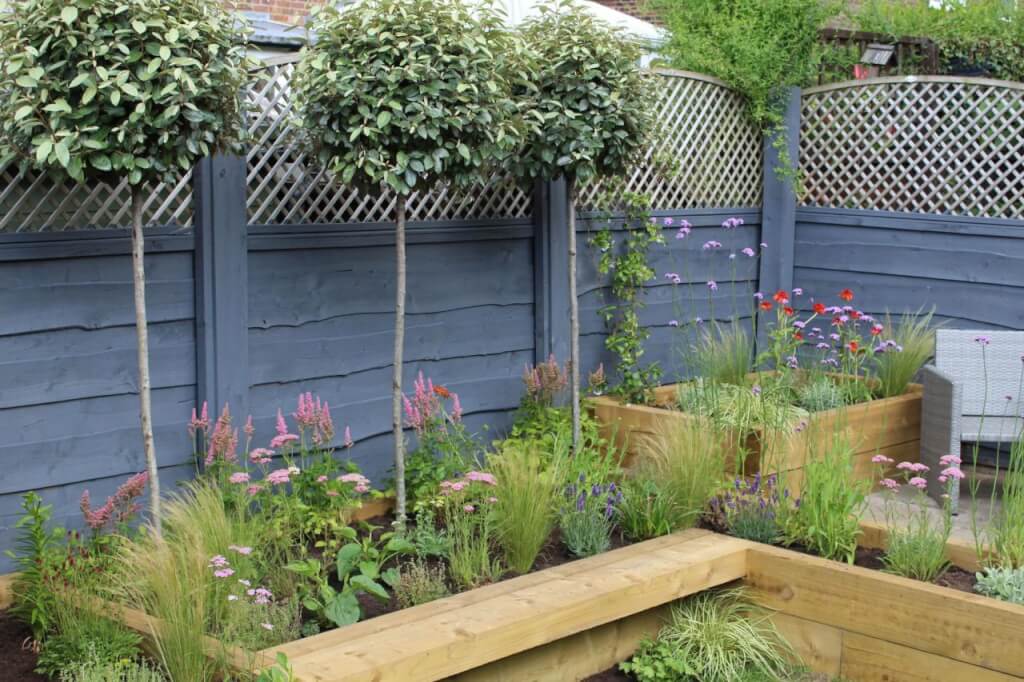
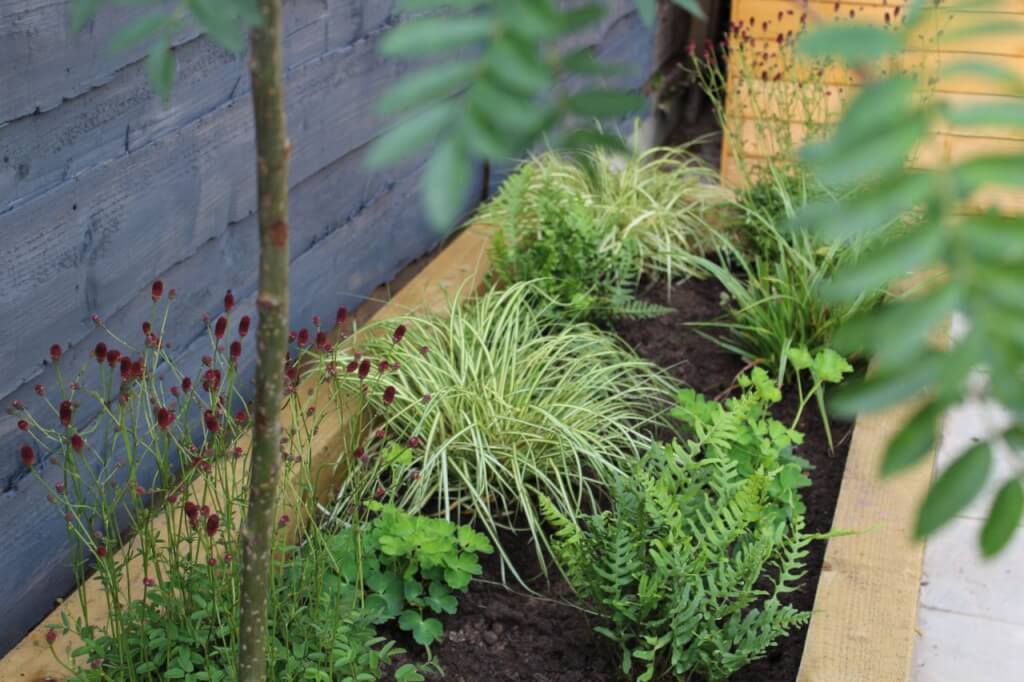
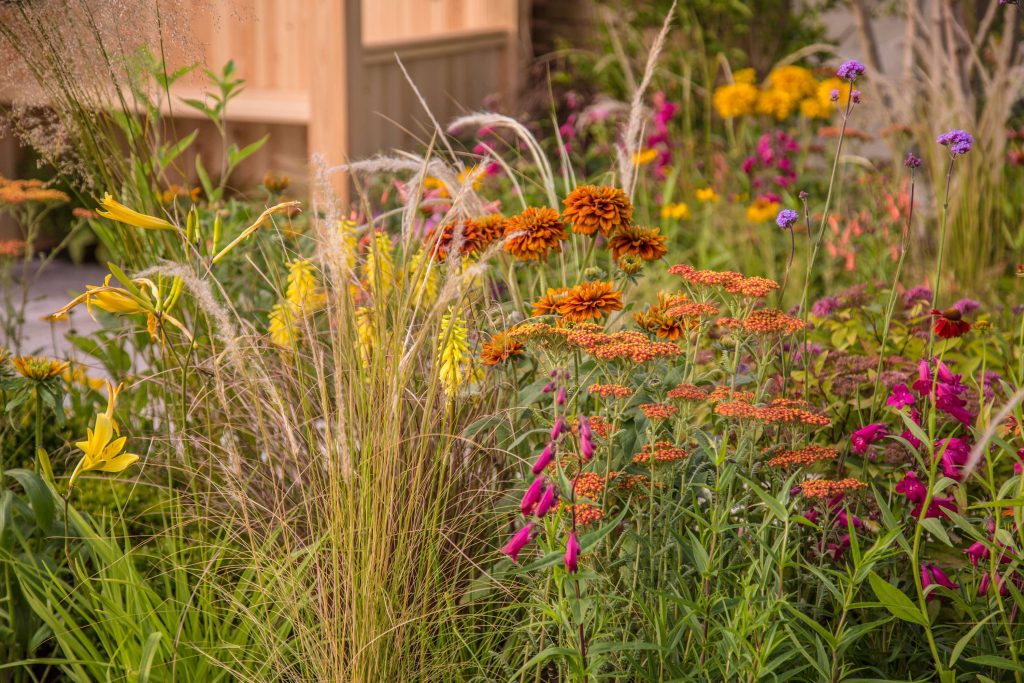
The raised beds around the children’s zone contained a mix of super tough hardy herbaceous perennials, grasses and shrubs. In addition to this, they also had woven through them some beautiful, delicate specimens. Thus giving a more sophisticated feel than just bedding plants and evergreen shrubs. These borders were designed to encourage visitors to want to investigate these plants further, ask questions and become engrossed in the drifts of planting rather than focusing on the small size of the garden.
How to deal with a shady border in family friendly garden design
The far left of the garden was dappled shade for most of the day due to a fence and neighbouring trees. By choosing shade-loving plants, such as Sanguisorba and ferns, that would thrive in the moist conditions, I brightened up this area. I also use the two trees, Malus ‘Sparta’ and Sorbus ‘Joseph Rock’, to give some height and further privacy to this area.
Family Friendly Plant List
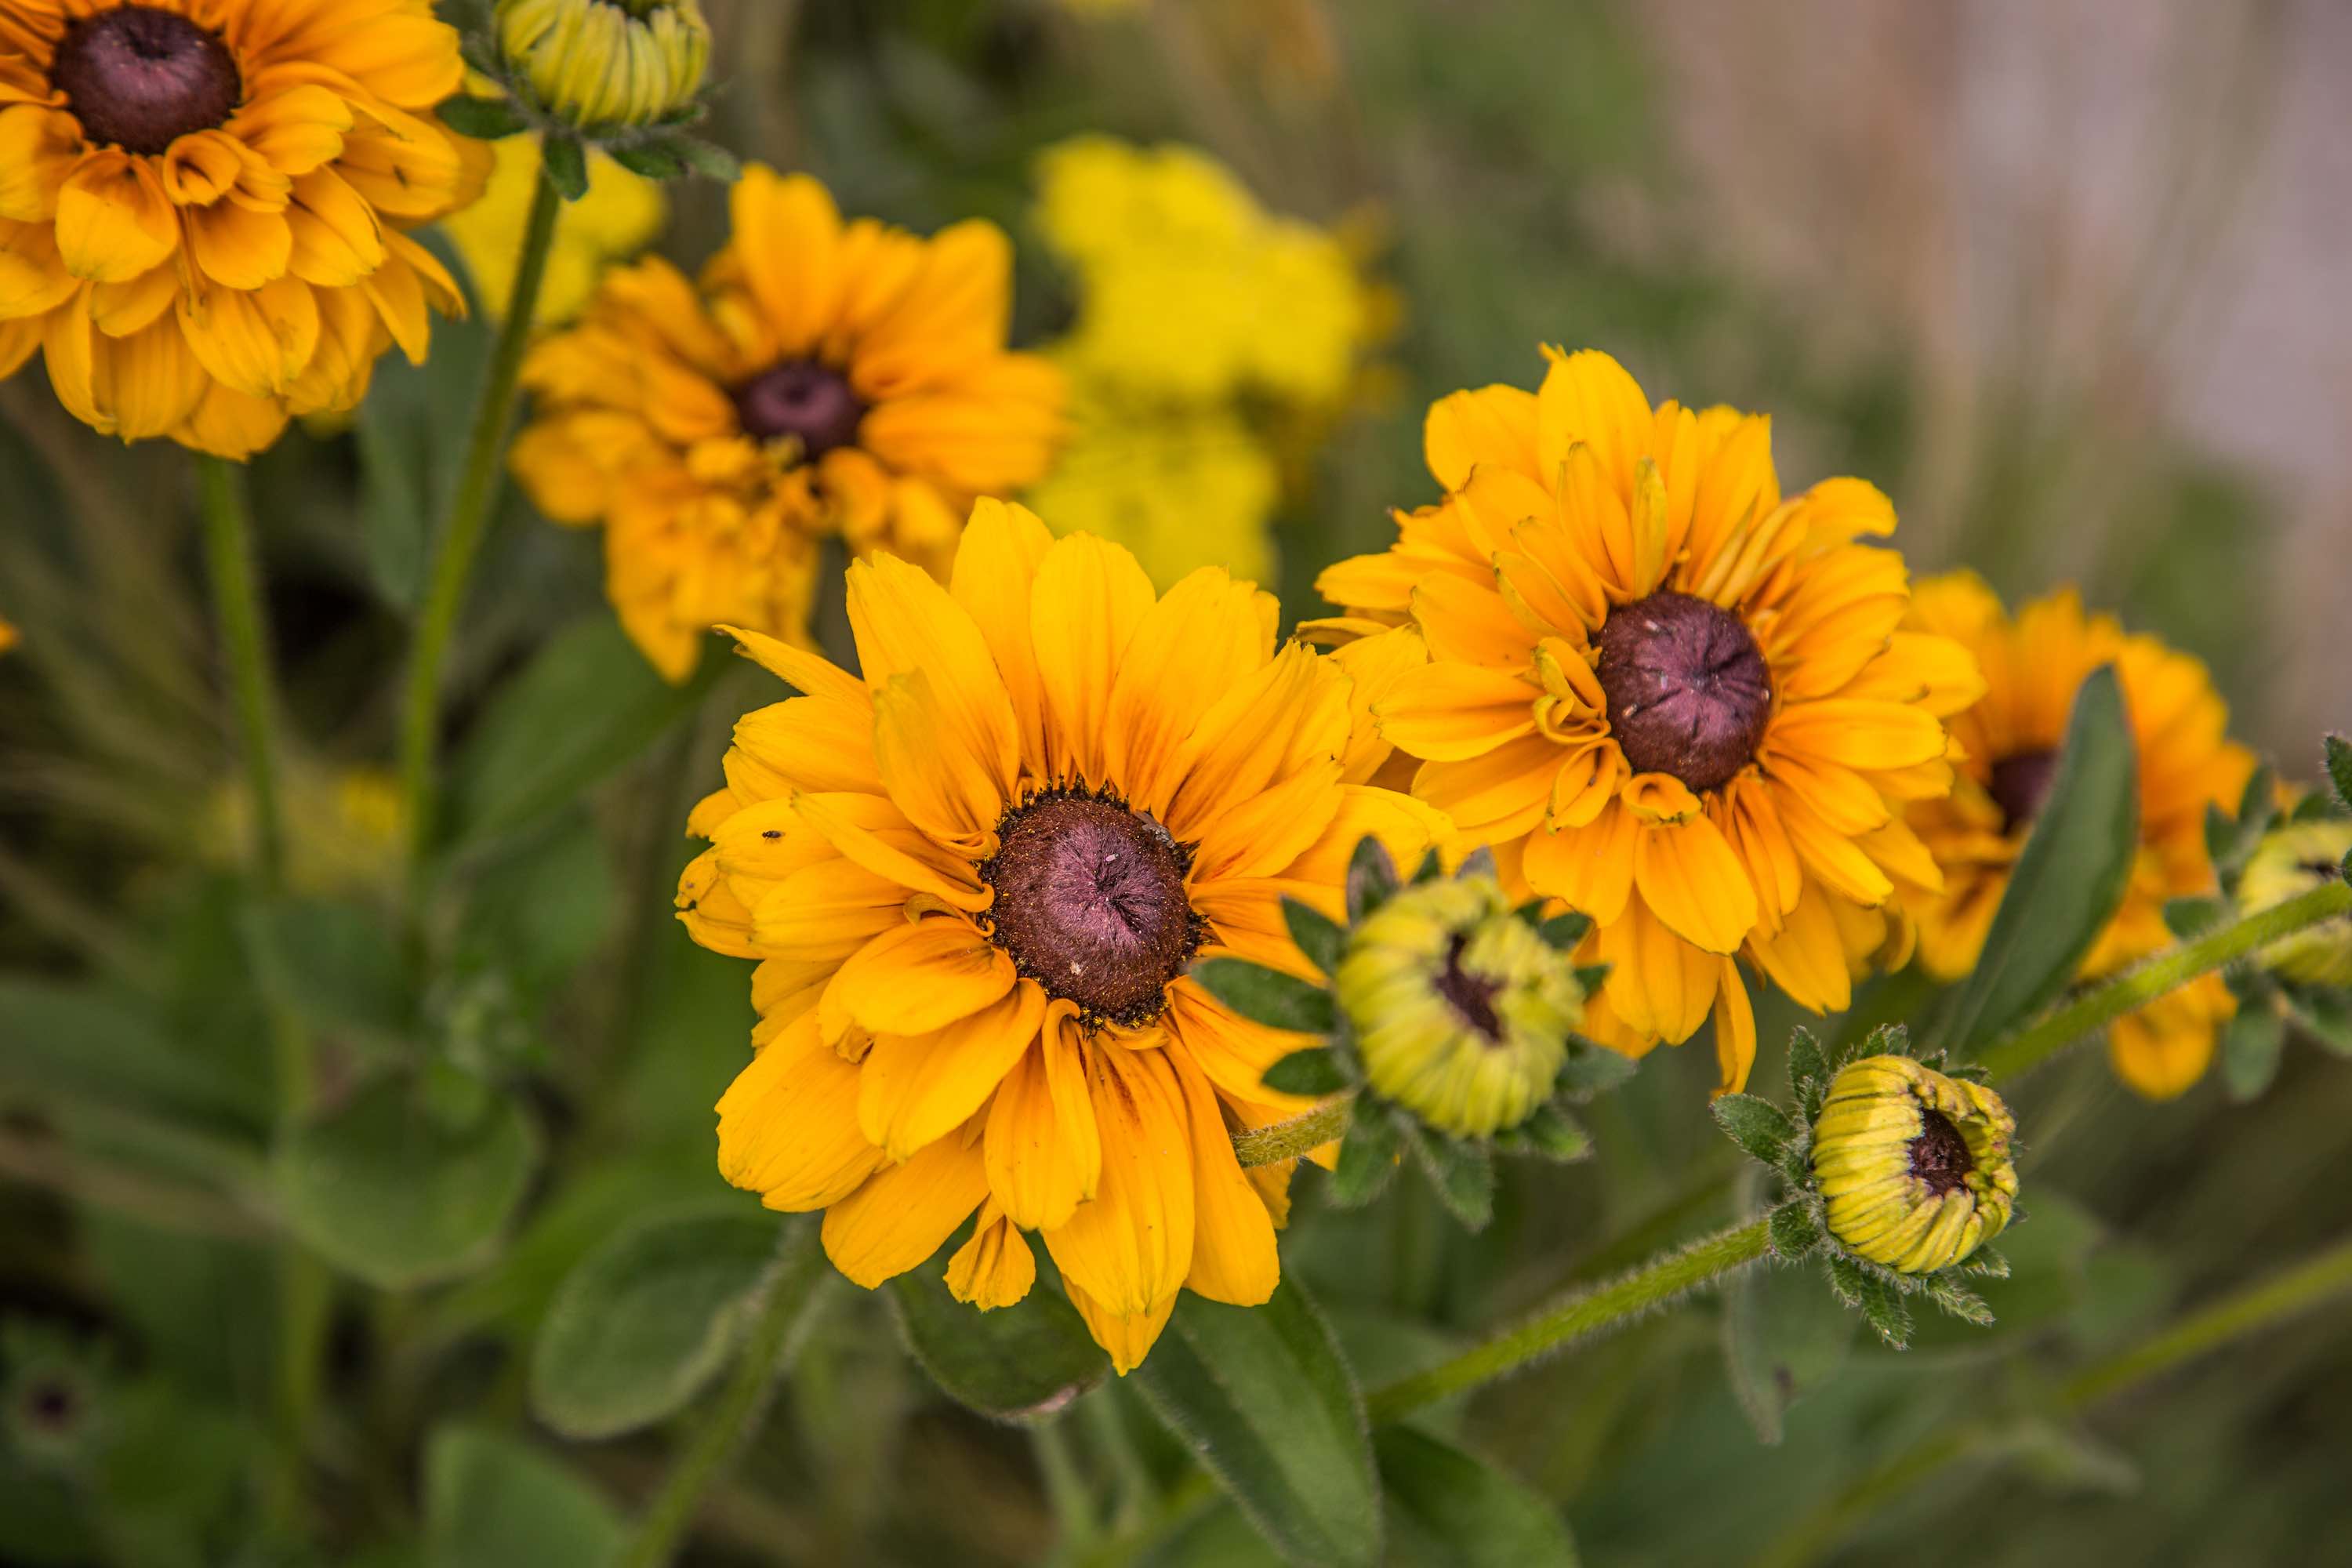
The plants chosen are all super pollinators so they are great for bees and wildlife. I created a planting scheme that brought colour throughout the season allowing the garden to morph over the seasons extending interest. You can see more below about the plants I used to create this family friendly garden.
Plants: Toxic, Dangerous, or Just Fine?
I covered toxic plants in the child-friendly garden article, but it’s worth reiterating here. The vast majority of common garden plants pose minimal real risk. Yes, many contain toxins. Yes, some cause skin irritation. But actual serious poisoning incidents from garden plants are remarkably rare because most plant parts taste disgusting and children spit them out immediately.
The genuinely dangerous plants that I actively exclude from family gardens are few: Aconitum (Monkshood) contains deadly toxins and looks deceptively innocuous. Euphorbia species have highly irritant latex sap that causes serious skin reactions. Laburnum seeds are seriously toxic. Ricinus communis (castor oil plant) seeds contain ricin. Giant hogweed (Heracleum mantegazzianum) causes severe photodermatitis.
Beyond those, I take a balanced approach. Yes, many plants cause mild stomach upset if eaten. Yes, some cause skin irritation in sensitive individuals. But teaching children not to eat random plants and to wash their hands after gardening manages these risks adequately for most families.
Storage Solutions: Making Family Garden Clutter Disappear
Families generate garden clutter at astonishing rates. Bikes, scooters, balls of every description, outdoor toys, sports equipment, garden tools, and all the miscellaneous paraphernalia of family life need somewhere to live. Without adequate storage, it migrates across the garden, creating visual chaos and making the space feel smaller and more cluttered than it actually is.
I’m going to walk you through multiple storage approaches I’ve used successfully because storage needs vary dramatically depending on what you’re storing, how much garden space you have, and your budget.
The Shed: Getting It Right
If you’ve got space for a proper shed, it’s probably your single best storage investment. However, not all sheds are created equal, and the bottom-end options from big box stores are often false economies. Thin tongue-and-groove cladding, inadequate frames, and poor weatherproofing mean they last five to seven years before falling apart.
For family gardens, I typically specify sheds at least 2.4m x 1.8m because smaller ones fill up instantly and become unusable. Go for 12mm or ideally 16mm tongue-and-groove cladding, proper pressure-treated timber or substantial painted finish, and apex roofs rather than pent roofs if you want longevity.
Position sheds strategically. Tucking them in corners or against boundary fences makes them less visually dominant but also using them to break up zones is a clever trick too. So don’t just wedge them into a corner! Painting them dark colours (charcoal, black, heritage greens) makes them recede visually compared to the standard pale timber finish that catches your eye constantly.
Green roofs transform sheds from eyesores into features. A Sedum roof adds maybe £200 to shed costs but creates a living roof that benefits wildlife, manages rainwater, and makes the shed visually integrate with planting. It’s particularly effective in small gardens where you’re overlooked; neighbours see a living roof rather than a shed roof.
Integrated Storage in Hard Landscaping
This is where clever design adds storage capacity without adding separate structures. I mentioned deck storage earlier, but it’s worth expanding on this because it’s such an effective technique.
When constructing decking, design access hatches into the deck surface. These don’t have to be enormous; even 600mm x 600mm hatches provide useful storage for cushions, toys, or gardening equipment. Larger 1200mm x 600mm hatches can swallow bikes, scooters, or bulky items. Make the hatches from the same decking boards so they disappear visually when closed, add soft-close hinges or gas struts for safety, and ensure there’s adequate ventilation underneath to prevent damp and mould.
Similarly, integrated seating with storage underneath serves double functions. Build benches around patio edges with hinged seat tops revealing storage compartments. Make them deep enough for comfortable seating (minimum 450mm depth), and they’ll simultaneously provide substantial storage volume. Line the storage compartments with a breathable membrane rather than making them completely waterproof; this allows some air circulation whilst keeping most weather out.
Raised beds with storage compartments built into their structures are another integration opportunity. Create raised beds with hollow interiors accessed via hinged panels, providing hidden storage right within your planted areas. This works particularly well for borders flanking pathways where the access panels can open towards the path.
Gardens That Evolve: Designing for the Long Game as Children Grow
One of the biggest mistakes in family garden design is creating spaces perfectly suited to children aged three to seven and then discovering they’re completely wrong for everyone else. Children change rapidly, and gardens need to evolve with them without requiring complete redesigns every few years. I’m going to show you how to build in flexibility from the start.
The Lifespan of Play Equipment
Be realistic about how long children actually use specific play equipment. In my experience, slide usage peaks between ages three and six, then drops off sharply. By eight or nine, most children find slides boring. Swings have better longevity, typically remaining popular from toddlerhood through to early teens, though usage patterns change dramatically.
Climbing frames and adventure play structures have perhaps four to six years of peak usage before children either outgrow them physically or lose interest. That £2,500 climbing frame might deliver 1,000 hours of play, but it might deliver 50. Every child is different.
This is why I advocate for play features that have secondary purposes or can be easily removed. A pergola designed to support rope swings or climbing nets remains a beautiful garden structure even after play equipment is removed. Timber posts set for swings can later support shade sails or climbing plants. Structures that are bolted together rather than concreted in can be dismantled and removed when no longer wanted.
Sandpits are brilliant examples of short-lifespan features. They’re adored by toddlers and younger children, ignored by anyone over eight. Design sandpits with their eventual transformation in mind. A timber-framed sandpit can become a raised vegetable bed by simply emptying the sand and filling with topsoil. A square timber frame that held sand becomes a frame for a water feature, a herb garden, or additional seating.
Teenagers: The Forgotten Demographic
Most family garden design focuses intensely on young children and largely ignores teenagers, which is bizarre because teenagers use gardens differently and have distinct needs. By the time children hit twelve or thirteen, they’re not playing on swings anymore, but they might actually want to be in the garden if you give them reasons.
Teenagers want privacy from parents, spaces to hang out with friends, and increasingly, they want the same creature comforts as adults. A covered seating area with decent furniture, ideally with power sockets for charging phones (yes, really), creates somewhere they’ll actually use. Hammocks are surprisingly popular with teens; something about the swaying motion appeals across ages.
Fire pits or chimineas (assuming you’re comfortable with the responsibility) make evening gathering spots. I’ve designed several gardens where dedicated fire pit areas became the teenagers’ preferred hangout spots, especially during summer evenings.
If teenagers develop an interest in gardening (and some genuinely do), give them proper space and responsibility. Not a token square metre of border but an actual, substantial growing area. A greenhouse section, proper vegetable beds, or a project like growing cut flowers for pocket money can engage teenage interest in ways that children’s play features never will.
Design for this evolution from the start. That play zone that currently holds a climbing frame might transform into a teenage gathering area. Keep it separate from main adult spaces, but ensure it’s still a pleasant place to be rather than just a dumping ground for outgrown play equipment.
Planting Evolution: From Tough and Cheerful to Sophisticated
When children are young, planting needs to be resilient enough to survive footballs, trampling, and general chaos. This typically means relatively robust, unfussy plants that recover from damage and aren’t so precious that you panic every time a ball flies through them.
As children mature and garden respect improves (usually around age eight to ten), you can transition towards more sophisticated planting schemes. That border that was filled with bombproof Geraniums and Alchemilla can gradually incorporate more delicate species. Grasses that younger children would have flattened become viable. Plants with longer flower spikes that would have been snapped off become possible.
Plan this transition when initially designing. Create border structures that work for both phases. Deep borders with tough plants at the front and more delicate species towards the back allow evolution without redesign. The tough plants protect the delicate ones during the chaos years, and as respect improves, those delicate plants can take centre stage.
Avoiding Garden Design Mistakes
The most important thing with a family-friendly garden design is that it actively encourages people to go out into the garden and enjoy it! By spending time considering how to lay out the garden, choosing your family garden functions carefully and planting, you can create somewhere for the family.
Now you know what’s involved in creating a family-friendly garden, why not consider taking your skills to the next level with some online design training? My Garden Design for Beginners Course is here to help take your garden from average to amazing with an affordable online course, no matter how little your experience with plants.
This course offers step-by-step guidance from me, Lee Burkhill, award-winning garden designer and presenter on BBC1’s Garden Rescue. In this course, you’ll go from a garden design novice to a confident designer equipped to tackle any green space.
Planting Techniques – Select and arrange plants like a pro.
Design Styles & Layout Options – Explore different styles to suit every garden.
Course Features:
20 Hours of Study Time
Flexible Online Learning
Engaging Video Lessons & Quizzes
Real-World Case Studies
Certification upon Completion
Taught by Award-Winning Designer Lee Burkhill
Enrol now for just £199 and start your journey toward garden design mastery!
29
Garden Design Examples for Small Gardens: 30 Design Templates & Planting Plans
Garden Design Examples for Small Gardens: 30 Design Templates & Planting Plans: In this online gardening course, I’ll walk you through 30 fantastic garden designs, explaining the logic behind the layout, the plant choices, and take-home tips for applying them in your own garden.
Weekend Garden Makeover: A Crash Course in Design for Beginners
Learn how to transform and design your own garden with Lee Burkhills crash course in garden design. Over 5 hours Lee will teach you how to design your own dream garden. Featuring practical design examples, planting ideas and video guides. Learn how to design your garden in one weekend!
Garden Design for Beginners: Create Your Dream Garden in Just 4 Weeks
Garden Design for Beginners Online Course: If you want to make the career jump to becoming a garden designer or to learn how to design your own garden, this is the beginner course for you. Join me, Lee Burkhill, an award-winning garden designer, as I train you in the art of beautiful garden design.
With careful consideration, you can create a garden that’s fit for the entire family, whether it’s young children who want to play, teenagers who want to be left alone with their phones or adults who want somewhere to relax. It just takes careful planning and not getting too caught up in Chelsea flower show styled perfection. Do you have a garden that needs a Garden Ninja transformation? Why not get in touch with me to start your own dream garden design!
If you’ve found this family garden design guide helpful why not follow me on Youtube where I’ve got plenty of gardening guides? Or leave a comment in the blog below with your garden questions for me to answer.
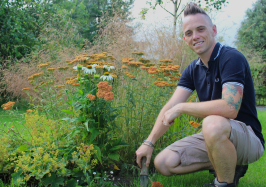
Lee Burkhill, known as the Garden Ninja, is an award-winning garden designer and horticulturist with over 30 years of gardening experience and 15 years as a professional garden designer. A qualified RHS (Royal Horticultural Society) professional, Lee specialises in sustainable garden design and practical horticultural advice. He designs and presents on BBC1’s Garden Rescue and in leading gardening publications. Lee combines three decades of hands-on gardening knowledge with professional design qualifications to help gardeners create beautiful, functional outdoor spaces.
I can thoroughly recommend Lee for both his garden design and installation service. First class service.
The design phase was detailed and thoughtful. Lee clearly listened to what our priorities were, turning a sad north facing plot into a colourful space that worked for both adults and two children.
Lee's choice of plants was fantastic and looking out on the design daily it still stops us in our tracks.
Thanks Lee, and best of luck.


